5.2.1 Network & Blueteeth
This chapter mainly introduces how to modify the wired and wireless network configurations of the development board.
Wired Network: RDK X5 (>= 3.3.0) RDK X3 (>= 3.0.2
The development board's wired network uses a static IP configuration by default, with an initial IP address of 192.168.127.10. Users can switch between static and DHCP modes using the following methods.
[shell] Modify static IP
The static network configuration of the development board is saved in /etc/NetworkManager/system-connections/netplan-eth0.nmconnection a file. By modifying address1 the fields, you can modify the static IP configuration. route-metri It is the network priority configuration. It is set 700 to make the wired network have a lower priority. When both wired and wireless networks are enabled at the same time, the wireless network will be used first.
sudo vim /etc/NetworkManager/system-connections/netplan-eth0.nmconnection
[connection]
id=netplan-eth0
uuid=f6f8b5a7-9e23-49b2-a792-dc589b3d3e88
type=ethernet
interface-name=eth0
timestamp=1754294545

[ethernet]
wake-on-lan=0

[ipv4]
address1=192.168.127.10/24,192.168.127.1
dns=8.8.8.8;8.8.4.4;
method=manual
route-metric=700

[ipv6]
addr-gen-mode=eui64
method=ignore

[proxy]
After the modification is completed, enter sudo restart_network the command in the command line to make the configuration take effect.
[shell] Modify DHCP
Modify [ipv4] the fields, keeping only method=auto and route-metric=700
[ipv4]
method=auto
route-metric=700
After the modification is complete, enter the sudo restart_network command in the command line to make the configuration take effect.
[shell] Modify MAC address
Modify [ethernet] the field, add cloned-mac-address=12:34:56:78:9A:BA
[ethernet]
cloned-mac-address=12:34:56:78:9A:BA
wake-on-lan=0
After the modification is complete, reboot the system for the configuration to take effect.
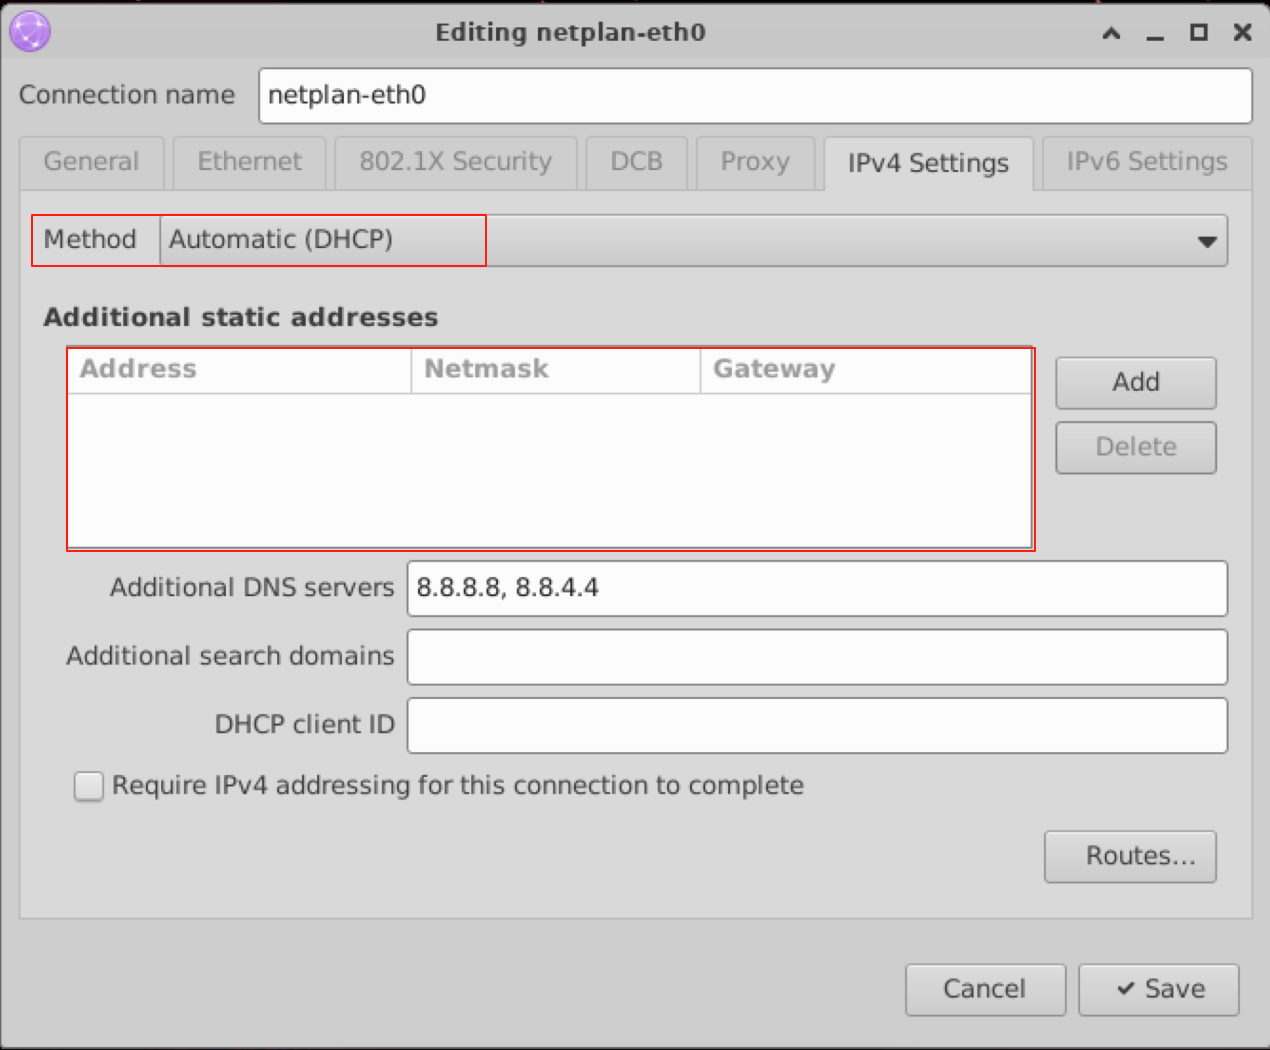
[Desktop] Modify static IP
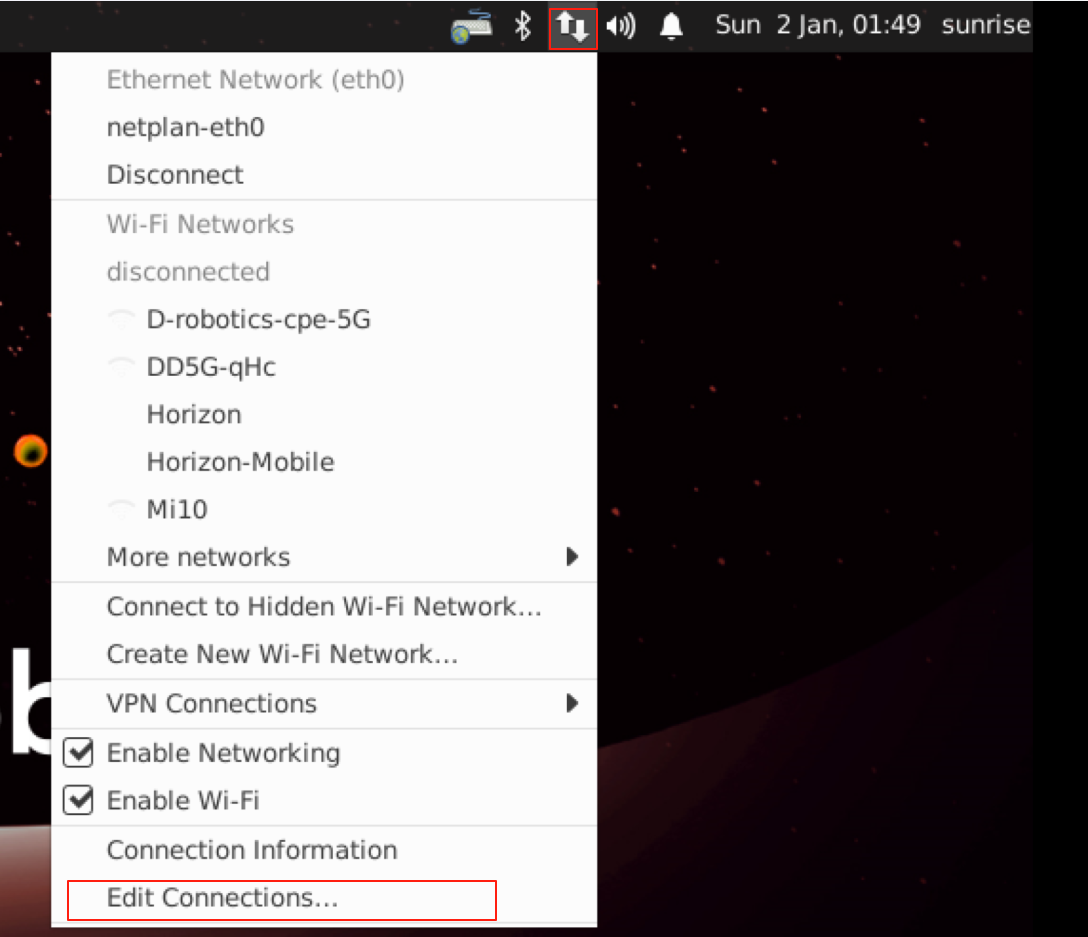
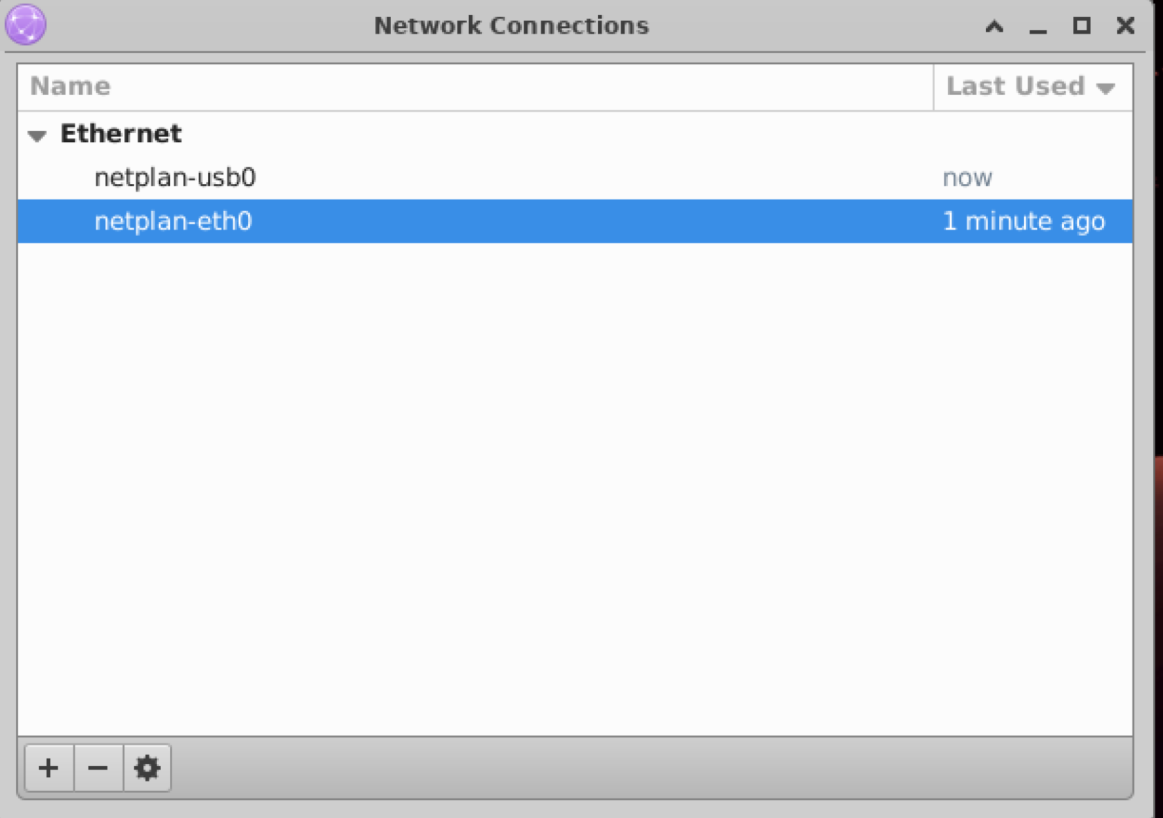

[Desktop] Modify DHCP
[Desktop] Modify MAC address
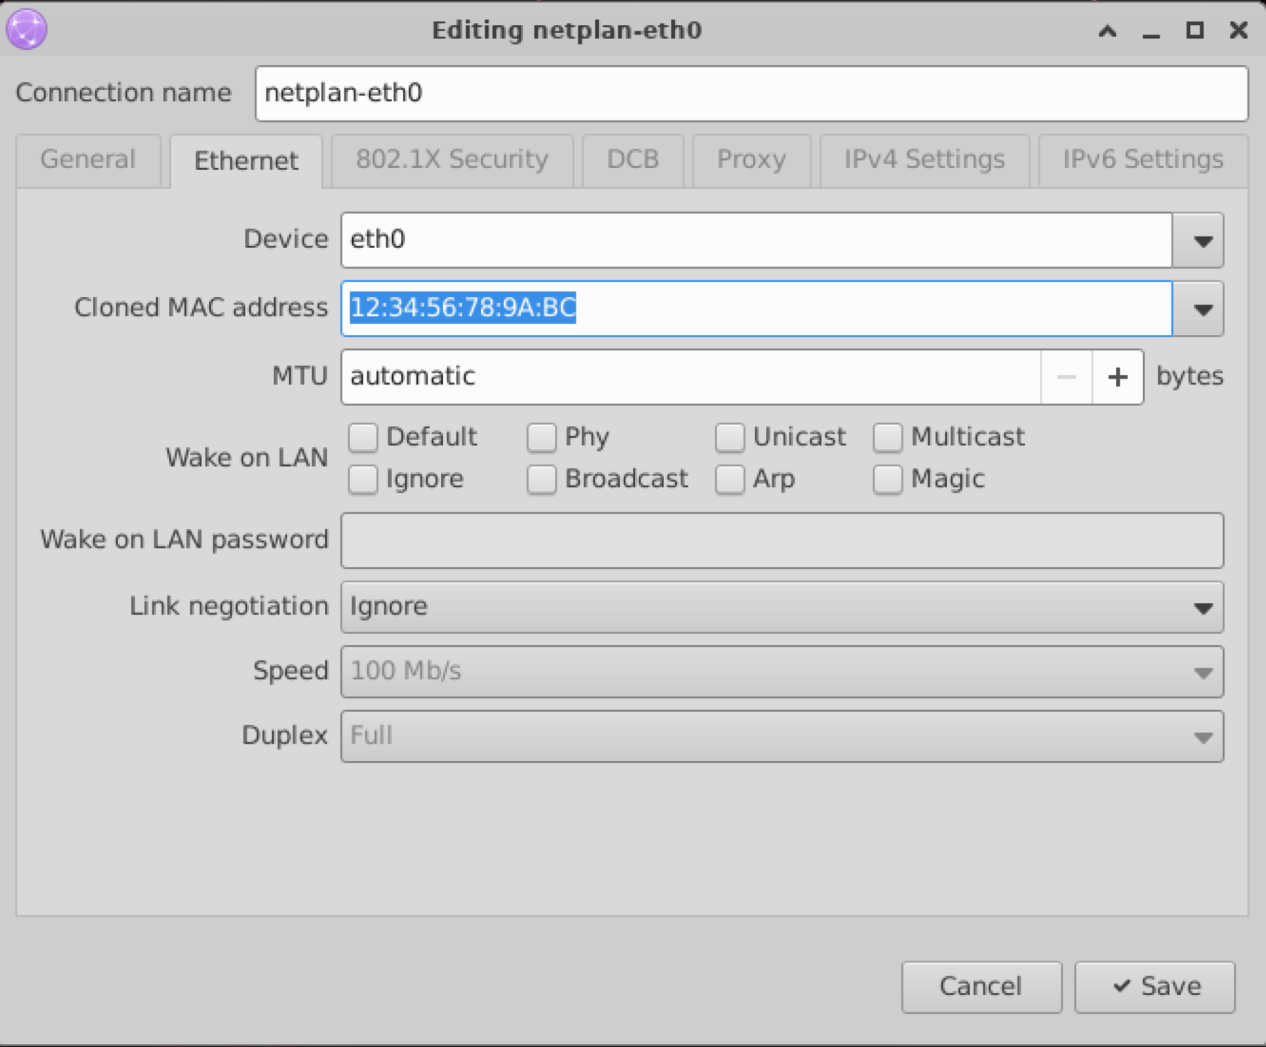
[Desktop] Configuration
Click it netplan-eth0 to make the configuration take effect.
Wired Network: RDK X5 (< 3.3.0) RDK X3 (< 3.0.2
Video: https://www.bilibili.com/video/BV1rm4y1E73q/?p=11
The development board's wired network uses a static IP configuration by default, with an initial IP address of 192.168.127.10. Users can switch between static and DHCP modes using the following methods.
Modify static IP
The static network configuration of the development board is saved in /etc/network/interfaces a file. By modifying the fields such as address, netmask, gateway and so on, you can modify the static IP configuration. metric It is the network priority configuration. It is set 700 to make the wired network have a lower priority. When both wired and wireless networks are enabled at the same time, the wireless network will be used first. For example:
sudo vim /etc/network/interfaces
# interfaces(5) file used by ifup(8) and ifdown(8)
# Include files from /etc/network/interfaces.d:
source-directory /etc/network/interfaces.d
auto eth0
iface eth0 inet static
    pre-up /etc/set_mac_address.sh
    address 192.168.127.10
    netmask 255.255.255.0
    gateway 192.168.127.1
    metric 700
After the modification is completed, enter sudo restart_network the command in the command line to make the configuration take effect.
Modify DHCP
DHCP (Dynamic Host Configuration Protocol) is usually used in a local area network environment. Its main function is to centrally manage and allocate IP addresses, so that hosts in the network environment can dynamically obtain information such as IP addresses, gateway addresses, DNS server addresses, etc., and can improve the utilization rate of addresses.
The DHCP network configuration of the development board is saved in /etc/network/interfaces a file. By modifying the eth0 related configuration, the DHCP mode can be modified. For example:
sudo vim /etc/network/interfaces
source-directory /etc/network/interfaces.d
auto lo
iface lo inet loopback
auto eth0
iface eth0 inet dhcp
    metric 700
After the modification is completed, enter sudo restart_network the command in the command line to make the configuration take effect.
Modify MAC address
If you need to modify the default MAC address of the development board, you can /etc/network/interfaces add pre-up configuration information to the file and specify the MAC address you need. For example:
sudo vim /etc/network/interfaces
# interfaces(5) file used by ifup(8) and ifdown(8)
# Include files from /etc/network/interfaces.d:
source-directory /etc/network/interfaces.d
auto eth0
iface eth0 inet static
    pre-up /etc/set_mac_address.sh
    address 192.168.127.10
    netmask 255.255.255.0
    gateway 192.168.127.1
    metric 700
    pre-up ifconfig eth0 hw ether 00:11:22:9f:51:27
After the modification is complete, reboot restart the system to make the configuration take effect.
Wireless
Video: https://www.bilibili.com/video/BV1rm4y1E73q/?p=12
The development board integrates a 2.4GHz wireless WiFi module that supports both Soft AP and Station modes. It runs in Station mode by default. The following describes how to use both modes.
Station
In Station mode, the development board acts as a client and connects to the router's wireless hotspot to connect to the Internet.
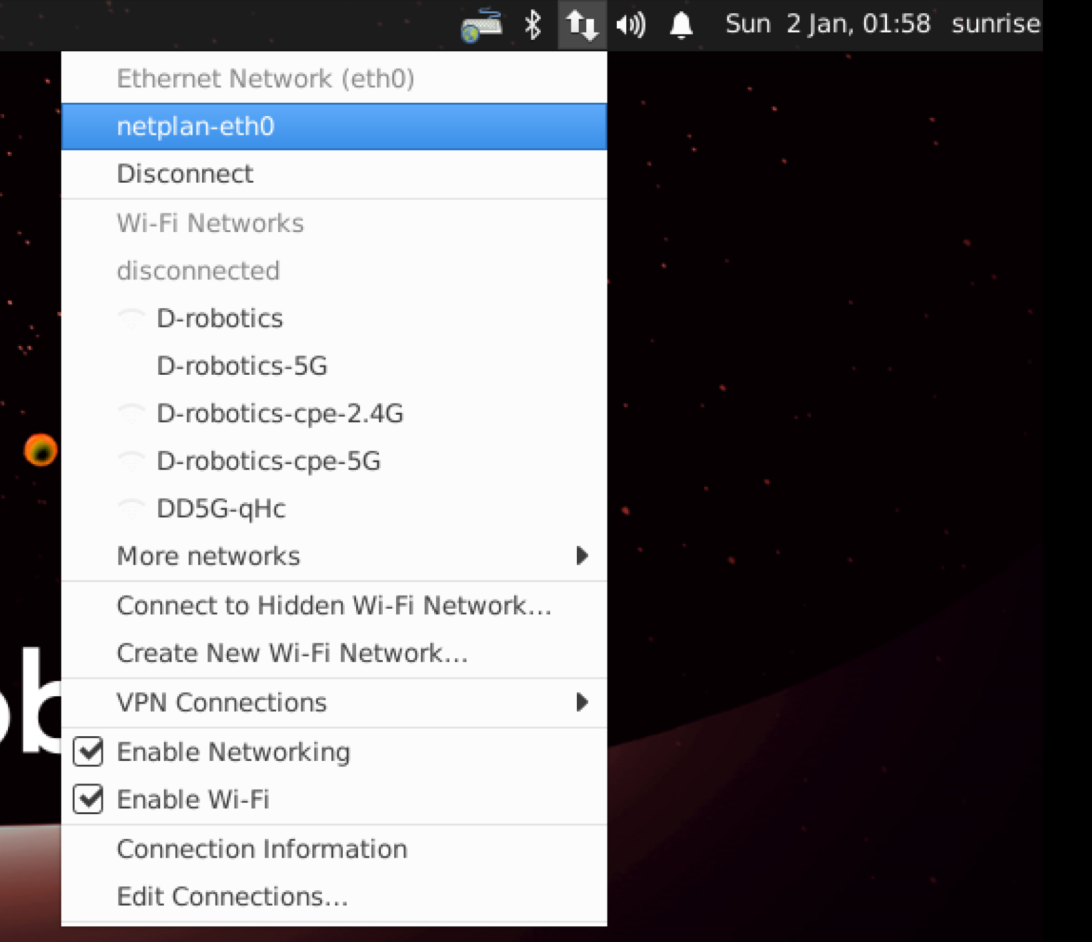
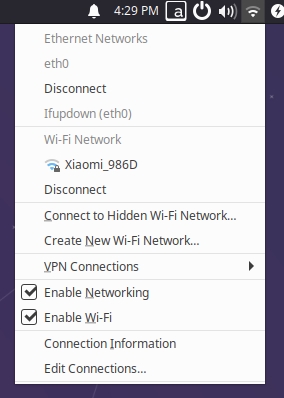
- For users using the Ubuntu Desktop version, click the Wi-Fi icon in the upper right corner of the desktop, select the corresponding hotspot and enter the password to complete the network configuration, as shown below:
- For users using the Ubuntu Server version, you can complete the wireless network configuration through the command line. The steps are as follows:
- Use
sudo nmcli device wifi rescanthe command to scan hotspots. If the following message is returned, it means that the scan is too frequent and you need to try again later.root@ubuntu:~# sudo nmcli device wifi rescan
Error: Scanning not allowed immediately following previous scan. - Use
sudo nmcli device wifi listthe command to list the scanned hotspots - Use
sudo wifi_connect "SSID" "PASSWD"the command to connect to the hotspot, and the following information is returned, indicating that the network connection is successfulroot@ubuntu:~# sudo wifi_connect "WiFi-Test" "12345678"
Device 'wlan0' successfully activated with 'd7468833-4195-45aa-aa33-3d43da86e1a7'.
Soft AP
The development board's wireless network runs in Station mode by default. To use Soft AP mode, follow the steps below to configure it.
- Installation
hostapdandisc-dhcp-serversudo apt update
sudo apt install hostapd
sudo apt install isc-dhcp-server - Run
sudo vim /etc/hostapd.confthe command to configurehostapd.conf, focusing on the following fields:interface=wlan0 #作为AP热点的网卡
ssid=Sunrise #WiFi名字
wpa=2 #0为WPA 2为WPA2 一般为2
wpa_key_mgmt=WPA-PSK #加密算法 一般为WPA-PSK
wpa_passphrase=12345678 #密码
wpa_pairwise=CCMP #加密协议,一般为CCMP- To configure a hotspot without a password,
hostapd.confadd the following to the file:
interface=wlan0
driver=nl80211
ctrl_interface=/var/run/hostapd
ssid=Sunrise
channel=6
ieee80211n=1
hw_mode=g
ignore_broadcast_ssid=0- To configure a hotspot with a password,
hostapd.confadd the following to the file:
interface=wlan0
driver=nl80211
ctrl_interface=/var/run/hostapd
ssid=Sunrise
channel=6
ieee80211n=1
hw_mode=g
ignore_broadcast_ssid=0
wpa=2
wpa_key_mgmt=WPA-PSK
wpa_pairwise=CCMP
wpa_passphrase=12345678 - To configure a hotspot without a password,
- Configuration
isc-dhcp-serverfile, the steps are as follows:- Execute the
sudo vim /etc/default/isc-dhcp-servermodificationisc-dhcp-serverfile and add the network interface defined as follows:
INTERFACESv4="wlan0"- Execute the
sudo vim /etc/dhcp/dhcpd.confmodificationdhcpd.conffile and uncomment the following fields:
authoritative;- Then
/etc/dhcp/dhcpd.confadd the following configuration at the end of the file:
subnet 10.5.5.0 netmask 255.255.255.0 { #网段和子网掩码
  range 10.5.5.100 10.5.5.254;#可获取的IP范围
  option subnet-mask 255.255.255.0; #子网掩码
  option routers 10.5.5.1;#默认网关
  option broadcast-address 10.5.5.31;#广播地址
  default-lease-time 600;#默认租约期限,单位秒
  max-lease-time 7200;#最长租约期限,单位秒
} - Execute the
- Stop
wpa_supplicantthe service and restart itwlan0systemctl mask wpa_supplicant
systemctl stop wpa_supplicant
ip addr flush dev wlan0
sleep 0.5
ifconfig wlan0 down
sleep 1
ifconfig wlan0 up hostapdStart the service as follows- Execute
sudo hostapd -B /etc/hostapd.confCommand
root@ubuntu:~# sudo hostapd -B /etc/hostapd.conf
 Configuration file: /etc/hostapd.conf
 Using interface wlan0 with hwaddr 08:e9:f6:af:18:26 and ssid "sunrise"
 wlan0: interface state UNINITIALIZED->ENABLED
wlan0: AP-ENABLED- Use
ifconfigthe command to configure the IP and network segment of the wireless interfacewlan0. Make sure to keep it consistent with the configuration in step 3.
sudo ifconfig wlan0 10.5.5.1 netmask 255.255.255.0- Finally, start
dhcpthe server and connect to the hotspot to10.5.5.100assign10.5.5.255an IP address to the client.
sudo ifconfig wlan0 10.5.5.1 netmask 255.255.255.0
sudo systemctl start isc-dhcp-server
sudo systemctl enable isc-dhcp-server- Execute
- Connect the development board hotspot, e.g.
sunrise
- To switch back to
Stationthe mode, proceed as follows: [RDK X5][Other]# 停止 hostapd
killall -9 hostapd
# 清除 wlan0 的地址
ip addr flush dev wlan0
sleep 0.5
ifconfig wlan0 down
sleep 1
ifconfig wlan0 up
# 重启 wpa_supplicant
systemctl unmask wpa_supplicant
systemctl restart wpa_supplicant
#重装wifi驱动
rmmod aic8800_fdrv
modprobe aic8800_fdrv
# 连接热点,,具体操作可以查看上一章节 “无线网络”
wifi_connect "WiFi-Test" "12345678"# 停止 hostapd
killall -9 hostapd
# 清除 wlan0 的地址
ip addr flush dev wlan0
sleep 0.5
ifconfig wlan0 down
sleep 1
ifconfig wlan0 up
# 重启 wpa_supplicant
systemctl unmask wpa_supplicant
systemctl restart wpa_supplicant
# 连接热点,,具体操作可以查看上一章节 “无线网络”
wifi_connect "WiFi-Test" "12345678"
DNS
Video: https://www.bilibili.com/video/BV1rm4y1E73q/?p=13
DNS (Domain Name Server) is a server that converts domain names and their corresponding IP addresses.
The DNS configuration of the development board is managed through /etc/systemd/resolved.conf a file. Users can complete the DNS related configuration by modifying the file. The steps are as follows:
- Modify
resolved.confthe file and add the DNS server address, for example:DNS=8.8.8.8 114.114.114.114 - Enable DNS configuration using the following command:
sudo systemctl restart systemd-resolved
sudo systemctl enable systemd-resolved
sudo mv /etc/resolv.conf  /etc/resolv.conf.bak
sudo ln -s /run/systemd/resolve/resolv.conf /etc/
System
For the sake of system security and stability, it is recommended that users apt update the system through commands after installing the system.
The /etc/apt/source.list file contains apt the command's software source list. Before installing the software, you need to apt update the package list using the command.
First, open the terminal command line and enter the following command:
sudo apt update
Next, upgrade all installed packages to the latest versions using the following command:
sudo apt full-upgrade
After executing apt full-upgrade the command, the driver, kernel files, and some system software may be reinstalled. It is recommended that users manually restart the device for the update to take effect. The command is as follows:
sudo reboot
Bluetooth
Initialization
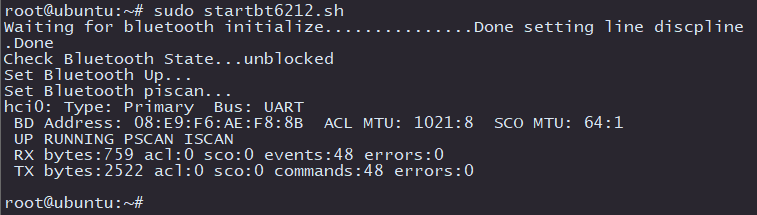
If the Bluetooth function of the development board is not enabled by default and hciconfig the device cannot be found, you can execute /usr/bin/startbt.sh the script to initialize it. The script completes the following tasks:
- Complete Bluetooth initialization
- Execute
hciconfig hci0 upto complete Bluetooth Link Up - Execute
hciconfig hci0 piscanBluetooth scan
Video: https://www.bilibili.com/video/BV1rm4y1E73q/?p=9
The log after the script is successfully executed is as follows:
In addition, users can use the command to query whether the Bluetooth process is normal. The command is as follows:
ps ax | grep "/usr/bin/dbus-daemon\|/usr/lib/bluetooth/bluetoothd"
/usr/bin/dbus-daemon

/usr/lib/bluetooth/bluetoothd
Communication
In order to give full play to the expansion capabilities of the development board, the current hardware design has integrated a variety of interfaces and peripheral resources.
Due to limitations in interface layout and hardware resource allocation, the development board cannot fully replicate all communication interfaces of the Bluetooth module.
Currently, only BT_RX BT_TX the two-line mode is provided, which can meet basic functions such as AT command interaction and data transmission without real-time requirements.
The Bluetooth module based on the UART interface has different interface connection methods and corresponding functions as follows:
- Basic Communication Mode (UART Only)
-
- Interface pins:
BT_RXBT_TX
- Interface pins:
-
- Functional features: UART-based asynchronous serial data communication (such as AT command interaction and low-speed data transmission) without a flow control mechanism. When the baud rate is overloaded or a large amount of data is continuously transmitted, there is a risk of data packet loss and buffer overflow.
- Enhanced transmission mode (adding hardware flow control)
-
- Interface pins:
BT_RXBT_TXBT_CTSBT_RTS
- Interface pins:
-
- Features: It can effectively avoid the risk of data packet loss and buffer overflow, and supports A2DP high-fidelity one-way audio streaming transmission.
- Voice communication mode (PCM synchronous interface)
-
- Interface pins:
PCM_SYNCPCM_DINPCM_CLKPCM_DOUT
- Interface pins:
-
- Features: Supports real-time two-way audio transmission based on SCO link, such as HPF/HSP
USB
If you need to make in-depth use of Bluetooth functions, such as SPP(蓝牙虚拟串口) achieving high-speed and stable communication in mode, PAN(蓝牙虚拟网卡) ensuring bandwidth quality in mode, or A2DP(高保真单向音频流) avoiding audio interruption in mode, it is recommended to use it first USB 接口蓝牙模块.
The development board has integrated USB2.0-BT common CSR8510 A10 Bluetooth drivers such as, and can directly support most firmware-free USB Bluetooth modules.


For Realtek the series Bluetooth modules, additional 固件 support is required. Please obtain the firmware adapted for the Linux platform from the module manufacturer and place it in the designated directory before normal use.
Network
Execute sudo bluetoothctl to enter the Bluetooth configuration interface in interactive mode. Device information similar to the figure below appears, indicating that Bluetooth has been recognized. Then show use it to view Bluetooth information and pay attention to Bluetooth powered status discoverable.
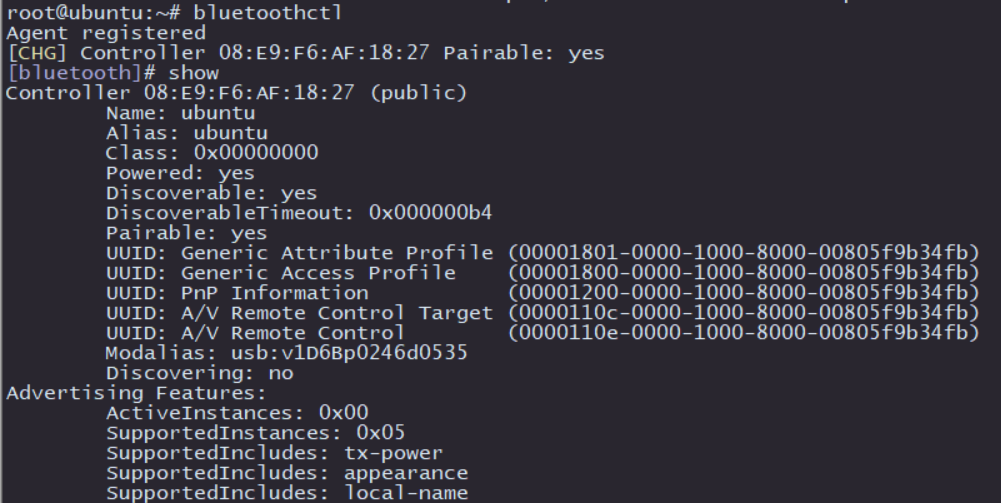
Execute power on Enable Bluetooth, as shown below:

In order to enable Bluetooth to be discovered by nearby devices, you need to discoverable on enable Bluetooth and turn on the Bluetooth discoverability property, as shown in the following figure:

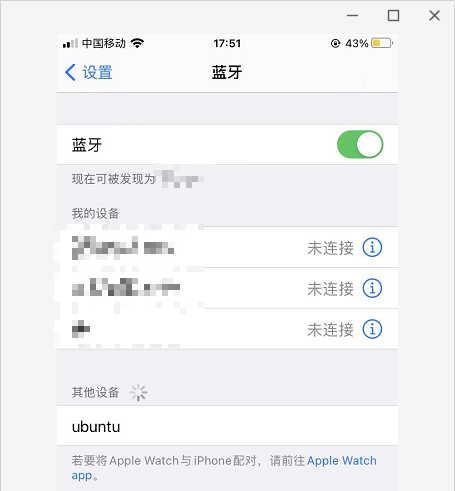
At this point, use your phone or computer to scan Bluetooth to find ubuntu the Bluetooth device with this name:
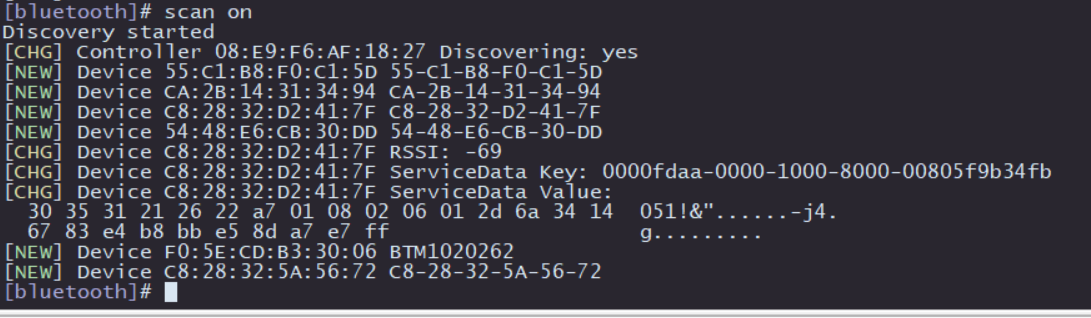
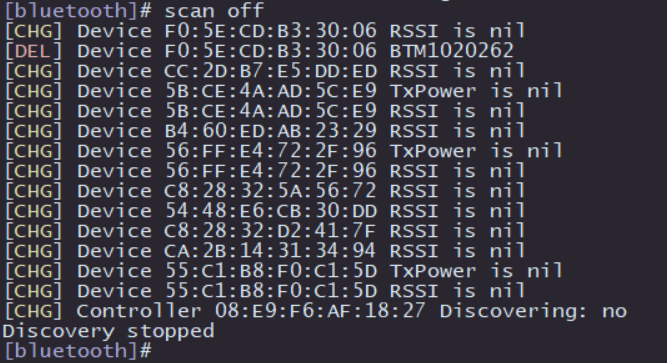
Next, test the active scanning function of Bluetooth. bluetoothctl Enter in the interactive interface scan on to turn on active scanning. It will periodically print nearby devices. You can see that my mobile device has been found. scan off Turn off the scanning function and print a summary of the scanned Bluetooth devices:
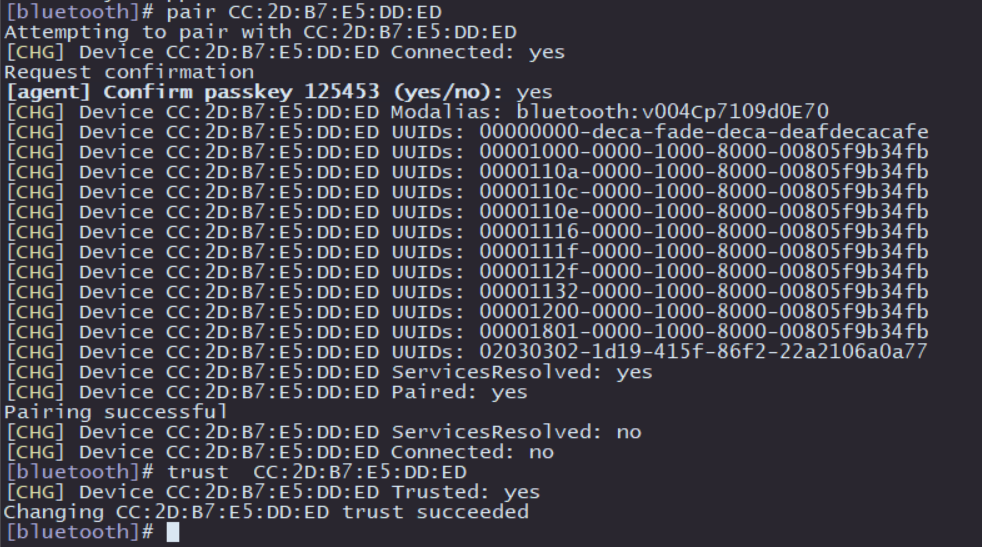
Then it is pairing with other Bluetooth:
- Pairing command:
pair [targetMAC], enter the command and follow the promptsyes. The other Bluetooth device selects配对an option to complete the pairing. - After pairing is successful, you can use it
trust [targetMAC]to automatically connect next time
After the above operations, the basic functions of Bluetooth scanning and pairing are completed. If you need to use more functions, you can refer BlueZ to the official help instructions.